How to record your Windows PC screen using Xbox Game Bar

Screen recording is helpful for a number of things, from creating a tutorial to grabbing a clip to post on Twitter to share with friends. On Windows 10, you can capture a video of your screen by using the built-in Xbox Game Bar.
The Xbox Game Bar was designed to record clips of video games, but it’s useful for any type of video capture. In order to use it, your laptop’s video card must support one of three encoders (an encoder translates video input into a compatible digital format): Intel Quick Sync H.264, Nvidia NVENC, or AMD VCE encoders.
If you want to check which video card your laptop has, open the Device Manager (by searching for “device manager” in your taskbar), and then click on “Display adapters.” Or you can simply try a test recording; if your laptop’s specifications don’t allow screen recording, you’ll get a message saying so.
If that happens, try to update the drivers for your video card. If your drivers haven’t been updated in a while, that might fix the problem. If that doesn’t work, there is a variety of Windows apps available (such as SnagIt) that can capture video for you.
Meanwhile, assuming that you have a computer that is capable of using Game Bar, here’s how you do it.
Game Bar is automatically installed in Windows 10. (If, for some reason, you can’t find it, you can download it here.) However, if you haven’t used it yet, it might be worth checking to make sure it’s working — especially before you try to record an important video. Press Windows + G on your keyboard. This should open up the Game Bar. If it doesn’t, here’s how to enable it:
- Go to the Start Menu
- Click on the cog icon to open Settings

- Click on “Gaming”
- Make sure the switch at the top labeled “Record game clips, screenshots, and broadcast using Game bar” is toggled to On

- This page also has keyboard shortcuts for Game Bar commands like opening the Game Bar, taking a screenshot and starting and stopping a screen recording. You can come up with your own shortcuts for these commands and enter them here if you wish.
Record your screen
Now you’re ready to record your screen. Keep in mind that Game Bar only records one application window at a time, usually the last window you clicked into, and you can’t switch to recording another window after you start recording. In addition, it won’t let you record your whole screen, so you can’t record your Desktop or File Explorer or a few other apps, such as Maps. The best thing to do is experiment ahead of time if possible.
Here’s how to record your screen:
- Open up the application window you want to record. It may help to close or minimize other windows to avoid accidentally recording the wrong one. Also, make sure any audio you don’t want in the recording is off, even if it’s from a different app or window — even though the screen recorder only records one window at a time, it will still record all of the audio playing across applications on the device.
- Press the Windows key + G to open up Xbox Game Bar
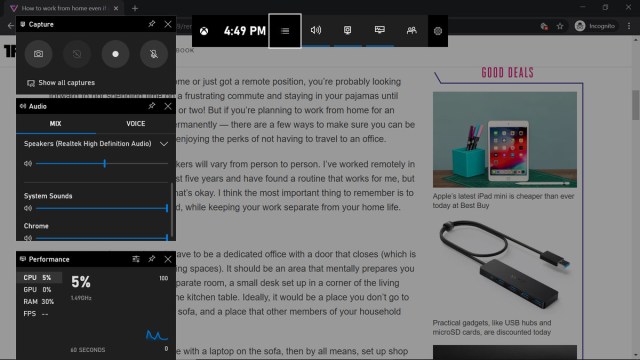
- You can click on the microphone button to enable external audio recording so you can add commentary or do a voiceover. (You’ll still record internal audio either way.)
- There is a number of other options that you can play with before you start recording. For example, using the “System sounds” section of the Audio window, you can lower the audio or mute any sounds from specific apps that happen to be open. When you have a moment, take some time to experiment.
- When you’re ready, click on the Record button (the one with a dot in it) to start recording.
- Alternatively, if you know that all of your options are set the way you want them, you can simply press Windows + Alt + R to start recording without going into the Game Bar.
- Either way, you’ll get a small pop-up bar with a timer and two recording controls. Click on the microphone button to switch your external mic on and off (your internal mic will still be on).
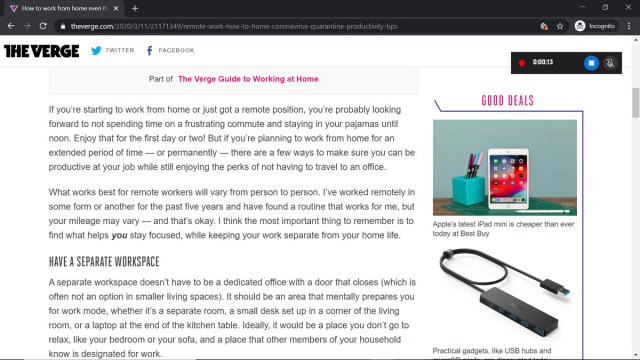
- When you’re done, click on the stop button in the recording bar or press Windows + Alt + R to stop recording
- Once you finish recording, a notification will pop up on the right side of your screen, saying “Game clip recorded.” You can click on that to open the “Captures” folder in File Explorer.
- Alternatively, you can find your recording through File Explorer. Go to “This PC” >“Videos” > “Captures.”

Vox Media has affiliate partnerships. These do not influence editorial content, though Vox Media may earn commissions for products purchased via affiliate links. For more information, see our ethics policy.
Screen recording is helpful for a number of things, from creating a tutorial to grabbing a clip to post on Twitter to share with friends. On Windows 10, you can capture a video of your screen by using the built-in Xbox Game Bar. The Xbox Game Bar was designed to…
